Description
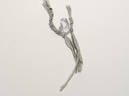
Conductive thread investigations took the form of multiple strands that used various techniques such as knotting and knitting to gauge the capability of thread to conduct current to vibrating beads. The lengths of conductive materials were short, and each incorporated one LED or bead to test conductivity. Lengths of knotted or knitted fabrics were attached to each other and the battery using alligator clips or tied together.
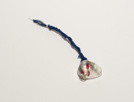
This was an investigation into the capabilities of stretch conductive fabric to act as a band and circuit to power resin LED beads. The band consists of two tubular conductive fabric strips with snaps sewn on to connect a series of beads in parallel. A pocket for the Arduino and battery is sewn to one side, which acts as a housing and a support to separate the two strips from each other. Neoprene is added to create a waterproof layer between the skin and Arduino and as a third band between the conductive tubes.
Conductive thread investigations took the form of multiple strands that used various techniques such as knotting and knitting to gauge the capability of thread to conduct current to vibrating beads. The lengths of conductive materials were short, and each incorporated one LED or bead to test conductivity. Lengths of knotted or knitted fabrics were attached to each other and the battery using alligator clips or tied together.
Design and Research Questions
- Does the vibrating bead lose any power/capability when the circuit is made of conductive thread instead of wiring?
- Can conductive thread be incorporated into a “friendship” bracelet design, and maintain functionality?
- Would multiple vibrating beads remain fully functional when connected to each other using conductive thread?
Components
- LightBlue Bean Arduino
- Stretchy conductive fabric
- Neoprene layer
- Snaps to connect beads
- LEDs or vibrating LED beads
- conductive thread and yarn
- 3V coin cell battery
Discussion
Kitted or knotted circuits, while successful, did not help solve problems related to bead addressability or possibilities of incorporating buttons and switches. Distance from the battery also negatively effected the functionality of the beads. Single pieces worked well, but when connected to each other, distance from the battery diminished the power flow to each bead. It is assumed that the conductive thread created too much resistance for the beads to be effectively powered.
The pocket for the Arduino worked well and was a snug fit. Connection of ports to each conductive tube had been considered a minor detail, so wiring was visible. Once the beads were snapped into place and current was run through the device, it became apparent that there was too much resistance being created by the fabric, as the beads were not fully functional. Conductive thread was run through the tubes and stitched into each snap to enhance the conductivity of the tubes, this helped, but distance from the battery still proved a problem to power all the beads.
While the conductive fabric seemed like a viable option because it offered flexibility and a one-size-fits-all style for manufacture, it became apparent that we would not be able to make a fully functional prototype using this method.
Kitted or knotted circuits, while successful, did not help solve problems related to bead addressability or possibilities of incorporating buttons and switches. Distance from the battery also negatively effected the functionality of the beads. Single pieces worked well, but when connected to each other, distance from the battery diminished the power flow to each bead. It is assumed that the conductive thread created too much resistance for the beads to be effectively powered.